1
Header & Transport
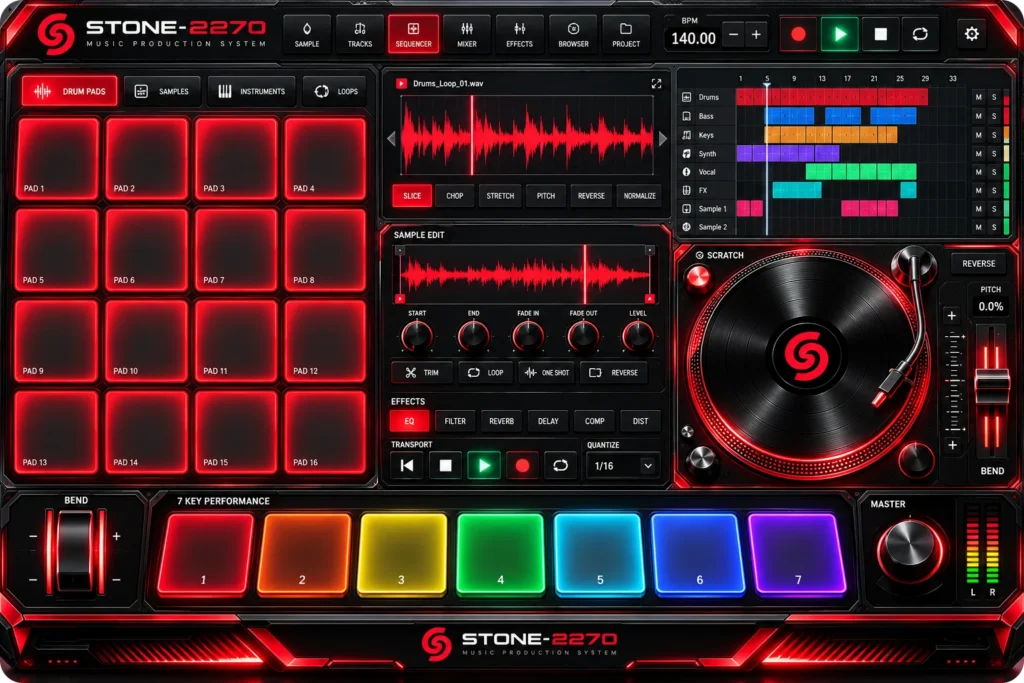
The top bar: views, tempo and the play controlsThe header runs across the top of the machine. Use it to switch the center screen, set the tempo and control playback.
- Sampler · Sequencer · Mixer · Sounds · Project
These five tabs change what the center screen shows. Each one is explained in section 3.
- BPM
The tempo, from 50 to 220 beats per minute. Type a number, or use − and + to move it one beat at a time.
- Tap
Tap this button in time with a song, three times or more, and the machine sets the tempo to match.
- Back to Start (⏮)
Jumps back to bar 1 and keeps playing, so you can hear your beat from the top or start a new pass. When stopped, it plays from the start. Shortcut Home.
- Record (red dot)
Starts recording on the armed track. If the beat is stopped, it starts playing too. Shortcut T.
- Play (green arrow)
Plays your beat on a loop. Press again to stop. Shortcut Space.
- Stop (white square)
Stops playback and recording.
- Settings (gear)
Opens the theme color wheel, MIDI controller setup, Low CPU mode, Full Screen and the keyboard shortcut list. See Settings & MIDI.
2
Drum Pads & Kits
16 big pads in four banksHit a pad with your mouse, a touch screen, your computer keyboard or a MIDI controller. The pad you hit last is the selected pad (white outline), and the Sampler edits that pad.
- Bank A · B · C · D
Four sets of 16 pads. Bank A starts with STONE Classic, Bank B with STONE Trap. Banks C and D hold your own sounds and chops.
- Kit
Loads a full drum kit onto the bank you are on. Pick a bank first, then a kit.
- Note Rpt
Note repeat. While the beat plays, hold a pad and it repeats on the Quantize grid. Great for hi-hat rolls.
- One Shot / Gate
One Shot plays the whole sound. Gate plays only while you hold the pad. This is set per pad.
- Load Sound
Opens the Sounds browser, where you can listen to every sound and drag the one you want onto any pad. Right-click a pad to open the full library with a pad picker instead.
- Keyboard
Pads 1–16 are 1234 · QWER · ASDF · ZXCV, starting top left. Hold Shift to hit softer.
Drum kits included
STONE ClassicSTONE TrapAKAI KitAKAI Kit 2SP1200 KitSP1200 Kit 2Hip HopBoom BapHardcoreTrapLo-FiGolden EraSoulStreet
Pro tipOpen hats and closed hats in the same kit cut each other off, just like a real hi-hat. Play a closed hat right after an open hat to choke it.
3A
Sampler
Center screen · Sampler tabThe Sampler brings new sounds into the machine, then lets you cut and shape them. New sounds always load onto the selected pad (the one with the white outline), so pick your pad first. Use Bank C or D if you want to keep your drum kits on A and B.
Get a sound
- Upload
Load an audio file from your computer (WAV, MP3, OGG, M4A, FLAC or AIFF). Long files keep the first 5 minutes. - Drag & drop from your computer
Drag sound files straight from your desktop or a folder onto the machine. Drop them on a pad to load it (drop several files and they fill the next pads in order), on the turntable to scratch, on the Sampler for the selected pad, or on a track to add them to your song (see Tracks). Dropping a .stone file opens that project. A dashed outline shows where the file will land.
- Link
Paste a direct link to an audio file. Some websites block this. If so, download the file and use Upload.
- Mic
Opens the microphone recorder. Pick your microphone from the Input list (built-in, USB mic or audio interface), watch the level meter, then use ● Record, ■ Stop and ▶ Play Take to hear it back. Happy with it? Press Load to Pad. Takes can be up to 60 seconds, and silence at the start and end is trimmed for you. Use headphones to stop feedback.
- Tab Audio
Sample live from another browser tab, such as a YouTube video. Works in Chrome and Edge on a computer. Pick the tab and tick Share tab audio, play the video, then press Stop & Load.
- Samples
Opens the sound library: Drum Kit Sounds (every sound from every kit), Scratches, SP1200 Drums and Dr. Dre Samples. Choose the bank and pad under Load Onto, search or filter by type, press ▶ to preview, Pad to load it on that pad, or Deck to put it on the turntable.
Edit the sound
- Waveform
Drag the two white markers to set where the sound starts and ends. The pad plays when you let go so you can hear it.
- Chop 16
Cuts the selected part into 16 equal slices and puts them on Bank D, one per pad. Perfect for chopping a loop.
- Copy
Copies the selected pad (sound, pitch, level, trim and fades) onto any other pad in any bank. The copy is fully separate, so you can play the same sample at two different pitches and change one without touching the other.
- Trim
Keeps only the part between the markers and throws away the rest.
- Reverse · Normalize
Reverse plays the sound backward. Normalize makes it as loud as it can go without clipping.
- To Deck
Puts the selected pad's sound on the scratch turntable. - Warp (time stretch)
Changes a sound's tempo without changing its pitch, so a loop or vocal fits your beat. Press WARP, enter the sound's Original BPM (or press DETECT, or type its length in bars) and the Target BPM, then press WARP. ÷2 and ×2 fix a guess that is half or double speed. Tick Follow the song tempo and the sound re-warps by itself whenever you change the BPM. UNDO WARP brings back the original.
- ▶ Play (green arrow)
Plays the sound on the selected pad so you can hear your trim and edits.
- ■ Stop (square)
Stops every sound that is playing right away: long samples, held notes, previews and the turntable. Shortcut Esc.
- Remove (trash can)
Takes the sound off the selected pad so the pad is empty again. Any hits for that pad in your song are removed too, and you are asked to confirm first.
- Sample Edit knobs
Start, End, Fade In, Fade Out, Level and Pitch (up to 24 semitones up or down).
Effects
The effects work on the whole mix. Pick an effect, press On, then turn its knobs. Turning a knob switches its effect on.
| Effect | Knobs | What it does |
|---|
| EQ | Low · Mid · High | Boosts or cuts bass, middle and treble by up to 15 dB. |
| Filter | Cutoff · Reso | A low-pass filter. Turn the cutoff down for a muffled sound, and turn up Reso for a sharper sweep. |
| Reverb | Amount | Adds room and space. |
| Delay | Amount · Feedback · Time | Echoes locked to your tempo: 1/16, 1/8, 3/16 or 1/4 note. |
| Comp | Squeeze | Evens out the volume and makes the beat hit harder. |
| Dist | Drive · Mix | Adds grit and saturation. |
Knob tipDrag a knob up or down to turn it. Hold Shift for fine control, use your mouse wheel, or double-click to reset it.
3E
Sounds (Drag & Drop)
Center screen · Sounds tabBrowse every drum kit and sample, listen to each sound, then grab it and drop it right onto a pad.
- Open the Sounds tab at the top of the machine (or press Load Sound under the pads).
- Pick a library (Drum Kit Sounds, Scratches, SP1200 Drums or Dr. Dre Samples). For drum kits, choose a kit to see its 16 sounds.
- Click any sound to hear it. Use Search or the type filter (Kick, Snare, Hi-Hat…) to narrow the list.
- Drag the sound onto any pad on the left. The pad gets a white dashed outline when you are over it. Let go and the sound is loaded and plays once.
- Drop a sound onto the turntable instead to scratch it.
Pro tipBuild your own kit: start from any kit, then drag in a kick from one kit, a snare from another and hats from a third. Your custom bank saves with your beat.
3B
Sequencer
Center screen · Sequencer tabThe step sequencer shows the 16 pads of the current bank as rows and 16 steps per bar as columns. It opens to a 4-bar loop. Click a step to add a hit on the armed track, and click it again to remove it.
- Drag a hit
Grab any lit step with the mouse and drag it to a new step or another row. Let go and it moves there, and you hear it.
- Drag a pad in
Drag a pad from the left onto any step to place that sound right there.
- Fix Timing
One click straightens out your whole song. Every hit and note snaps exactly onto the Quant grid (1/16 if Quant is off), so loose timing lines up perfectly. Want it tighter? Pick a bigger grid like 1/8 or 1/4 and press it again. Undo puts it back.
- Bars
How long your song is, from 1 up to 128 bars. Use − and +, press +4 to add four bars at a time, or type a number. New bars start empty (use Duplicate in the Song Editor to copy a section into them). Making the song shorter asks first before removing anything past the new end.
- Undo · Redo
Press Ctrl+Z (Cmd+Z on a Mac) to undo your last change: hits, notes, copies, pad sounds, pitch and trim. Press Ctrl+Y or Ctrl+Shift+Z to redo it.
- Big Grid
Press BIG GRID at the top of the Sequencer for much bigger steps. It covers the tracks, turntable and keys while you program. Press SMALL GRID to get them back.
- Copy a Hit (Shift-Drag)
Hold the mouse on a hit, press Shift and drag it to another step. A copy lands there and the original stays put. Drag without Shift to move it instead.
- Copy a Bar (Ctrl+D)
Press Ctrl+D (Cmd+D on a Mac) to copy the bar you are looking at into the next bar. Ctrl+C copies the bar and Ctrl+V pastes it right after, again and again. The song grows by itself if it needs more bars.
- Quant · Q ON / Q OFF
Quant picks the grid, from 1/4 down to 1/64, with triplet options. The Q button next to it turns record quantize on and off. Q OFF (the default) records your hits exactly as you play them. Q ON snaps each new hit to the Quant grid while you record. You can always press FIX TIMING afterward to snap a take.
- ◀ Bar ▶
The grid shows one bar at a time. Use the arrows to move between bars. With Follow on, the grid jumps along with the playhead while the beat plays.
- Swing
Pushes every other 16th note late for a looser, human groove. 0 is straight, 60% is heavy swing.
- Metro · Count-In
Metro plays a click. Count-In gives you one bar of clicks before recording starts.
- Undo · Redo
Steps back or forward through your changes. Shortcuts Ctrl+Z and Ctrl+Y.
- Clear Track · Del Song
Clear Track erases the armed track. Del Song erases everything so you can start over. Undo brings it back.
- Editor
Opens the big Song Editor where you can move, copy and delete any part of your song. See Song Editor. - Step RPT (rolls)
For hi-hat rolls and fast fills. Pick a rate: 1/32 (2 hits per step), 1/32T (3 hits per step, triplet), 1/16T (triplet 16ths) or 1/64 (4 hits per step). Now click a step to place a roll, or drag across steps to paint rolls. Click a roll again to remove it. Rolls show striped. Set it back to OFF for single hits. - Mixer ⧉
Opens the Mixer in its own window so you can mix while you program. See Mixer.
3C
Mixer
Center screen · Mixer tabOne channel strip for every track. With more than 8 tracks, scroll the strips sideways. Press + TRACK to add another one.
- Big Mixer
Press BIG MIXER at the top of the Mixer for a full console. Every track gets GAIN, a 3-band EQ (HF high, MF mid, LF low), PAN, REV and DLY sends, a level meter and its fader. Two analog VU meters with moving needles show the left and right output, and the red PEAK light flashes when it gets too hot. Double-click any knob to reset it. Press SMALL MIXER to get the turntable and keys back.
- Fader
The track's volume. Slide it up or down.
- Pan
Moves the track left or right in the stereo field.
- Rev · Dly
How much of the track goes to the reverb and the delay.
- M · S
Mute silences the track. Solo plays only the soloed tracks.
- Bend · Range
Chooses what the Bend lever controls (7 Keys, Scratch Deck or Both) and how far it bends, from ±1 to ±12 semitones. - Pop Out ⧉ (mixer window)
Press POP OUT here, MIXER ⧉ in the Sequencer or MIXER in the Song Editor to open the Mixer in its own window. It stays open while you use the Sequencer, Sampler or Song Editor. Drag its top bar to move it and drag the bottom-right corner to make it bigger or smaller. Press DOCK (or the Mixer tab) to put it back.
3D
Project & MP3 Download
Center screen · Project tab
- Name · Save
Name your beat and press Save. Saved beats are listed below with Open and Delete.
- New · Demo
New starts a blank beat. Demo loads a ready-made beat to play with.
- Play Loop
How many times your loop repeats in the download: 1, 2, 4, 8 or 16 times.
- Format
MP3 at 320, 256 or 192 kbps, or WAV in 16-bit or 24-bit for full quality.
- Download
Renders every track, effect, bend and scratch into one stereo file and downloads it. Your beat's name becomes the file name and the MP3 title.
- Stems
Saves every track that has something on it as its own file, all packed in one .zip. Every stem is the same length and starts at the same moment, so they line up perfectly when you drop them into a studio program or send them to a mixing engineer. Pick Stems as: WAV 24-bit (best for studios), WAV 16-bit, or the same as the Format above.
- Export .STONE · Import .STONE
Saves your whole project, including your own samples, as one file. Import it on another computer to keep working.
Good to knowSaves stay in this web browser on this computer. Your last session also saves itself and comes back the next time you open the page. To move a beat to another computer, use Export .STONE.
4
Tracks
Top right · the arrangement viewShows every track and every hit and note in your loop. A white line moves across while the beat plays. A new song starts with 8 tracks (Track 1 to Track 8), and you can add as many as you want. When there are more than 8, the list scrolls.
- R (Arm)
The armed track (lit red) is where new recordings go. Click R or a track name to arm it. - ✎ Name & Color
Click the pencil next to a track, double-click its name, or click the track name button at the top left of the Sequencer. A big Track Name & Color window opens. Pick any track with the numbered buttons, type a new name (up to 16 letters), tap a color (or the rainbow circle for any custom color), then press SAVE or Enter. In the Song Editor, use the RENAME button or double-click a track name. Names and colors are saved with your project, and names are used for stem file names.
- M · S
Mute and Solo, the same as in the Mixer. - + TRACK · − TRACK
+ TRACK adds a new track and arms it. There is no limit. − TRACK deletes the armed track and everything on it (Undo brings it back). You'll also find + TRACK in the Mixer and the Song Editor.
- Edit Song
Click Edit Song, or click anywhere on the track view, to open the Song Editor. - Audio & MIDI on any track
Every track can hold audio files and MIDI. Drag a WAV, MP3 or other sound file from your computer onto a track name, the track view or the Song Editor, or press + FILE to pick files for the armed track. Audio becomes a clip on the timeline (the song gets longer if it needs to). A MIDI file opens a short window: play it on the synth (pick a sound) or on the drum pads (notes 36 to 51 play pads 1 to 16), and optionally switch the song to the MIDI file's tempo. In the Song Editor, drag a clip to move it and double-click it to change its level, warp it to the song tempo, or delete it.
Pro tipRecord drums on Track 1, then arm Track 2 and play the 7 keys. Rename them anything you like. Each part stays on its own track so you can mix them separately.
4B
Song Editor
Move, copy and delete any piece of your songThe Song Editor opens over the machine and shows every track, bar and hit full size. Each colored block is one piece: a drum hit, a key note, a bend or a scratch move.
- Select
Click a piece to select it (it turns white and you hear it). Shift-click to add more, or drag a box on empty space to grab a group.
- Move
Drag selected pieces left or right to move them in time, or up and down onto another track. Hold Alt while dragging for no snap.
- Snap
Sets the grid pieces snap to while moving: 1 beat, 1/8, 1/16, 1/32 or Off.
- Fix Timing
Highlight pieces (drag a box or Select All), then press FIX TIMING to snap them exactly onto the Grid. With nothing selected it fixes the whole song. - Grid
Top right of the editor. Sets the grid for dragging and Fix Timing (1/4 to 1/64, triplets too). Changing it while pieces are highlighted snaps them to the new grid right away. Hold Alt while dragging to move a piece freely.
- Copy With Shift
Grab a piece and hold Shift while you drag to pull a copy anywhere, even onto another track. To copy a whole string of notes, drag a box around them first, then hold Shift and drag any one of them. Shift-click without dragging adds or removes a piece from the selection.
- Q ON / Q OFF
Next to GRID. Turns record quantize on and off, same as the Q button in the Sequencer.
- Duplicate · Copy · Paste
Drag a box around a section (or press Select All), then press DUPLICATE or Ctrl+D to paste a copy right after the end of that section. Or press Ctrl+C to copy and Ctrl+V to paste right after it. Each Ctrl+V adds another copy after the last one, and the song grows by itself. To copy single pieces, hold the mouse on them, press Shift and drag.
- Delete
Removes the selected pieces. Shortcut Delete or Backspace.
- All
Selects every piece in the song. Shortcut Ctrl+A.
- Clear Track
Erases everything on the armed track. Click a track name on the left to arm it.
- Delete Song
Erases the whole song so you can start over. You are asked to confirm first.
- Undo · Redo · Play · Close
Every change can be undone. Press Play to hear your edits while you work, and Close (or Esc) to go back to the machine.
Pro tipBuild a one-bar drum groove, select it, then press Duplicate to fill the next bar. Change a hit or two in the copy for a variation.
5
Scratch Turntable
Bottom right · scratch like a DJPut any sound on the record and scratch it for real. The sound follows your hand forward and backward at the speed you move.
- The record
Click and drag in a circle to scratch. Hold still to stop the sound. Let go and the record returns to its normal speed.
- Start / Stop
Spins the record up like a motor, or winds it down to a stop. Shortcut B.
- Reverse
Plays the record backward.
- Cut
Hold to silence the deck, like a crossfader. Tap it while scratching for cuts and transforms. Shortcut N.
- Load Pad
Puts the selected pad's sound, with its trim, on the record.
- Samples
Opens the library so you can put a scratch loop, drum or sample on the record.
- Pitch
Speeds the record up or down. Choose a range of ±8%, ±16% or ±50%, and press Reset to go back to normal. - Track
The menu above START, beside the turntable. Picks which track the turntable plays and records on. It starts on Scratch, so your scratches always get their own channel in the Mixer and their own file when you export Stems, no matter which track is armed. Switch it to any track and the scratches you already recorded move with it.
Pro tipScratches you do while recording are saved on Track 6 (or whichever track you pick in the turntable's Track menu) and included in your MP3 and as their own stem. Load one of the 90 BPM scratch loops and set your BPM to 90 for a perfect match.
6
Bend Lever
Bottom left · spring-loaded pitch bendPush the lever up to bend the pitch up, or pull it down to bend it down. Let go and it springs back to the center. The amount shows under the lever in semitones.
- Bend With the Mouse Wheel
Hold a color key down with either mouse button, then roll the mouse wheel to bend the note up or down. Let go of the key and the bend springs back.
- Keyboard
Hold ↑ or ↓ to bend all the way. Let go to spring back.
- Target & range
Choose 7 Keys, Scratch Deck or Both, and the bend range, in the Mixer tab.
7
7 Key Performance
Bottom center · seven rainbow keysSeven big keys play the seven notes of a scale, so every note fits. The note name shows on each key. You can play several keys at once for chords.
- Instrument
Lead, Bass, E-Piano, Pad, Pluck, Organ or Brass.
- Scale
Major, Minor, Pentatonic, Minor Pent, Blues, Dorian or Chromatic.
- Root note
The key your scale starts on, C through B.
- Oct − / +
Moves all seven keys down or up one octave.
- Sustain
Notes keep ringing after you let go. Turn Sustain off to release them.
- To Track
Chooses which track your key notes record onto. This is the same as arming a track.
- Keyboard
Keys 1–7 are GHJKL;'.
8
Master
Bottom right · final volume and metersThe big Master knob sets the overall volume of everything. The red M in the top right corner mutes everything at once. Click it again to bring the sound back. Mute only affects what you hear, never your exports. The L and R meters show the level of your mix: green is healthy, yellow is loud and red is the top. A built-in limiter keeps your downloads from clipping.
★
Recording a Beat, Step by Step
From empty to MP3
- Set your BPM, and in the Sequencer tab choose how many Bars and the Quant setting (1/16 is a good start).
- Arm Track 1 with its R button and pick a kit.
- Press Record (T). With Count-In on, you hear one bar of clicks and see a big 4 · 3 · 2 · 1 countdown over the pads. Start playing when it shows REC. Hits made during the countdown are not recorded, except a hit right before the 1, which lands on the 1.
- Play your drums on the pads. The loop keeps going, so you can add more on each pass. This is called overdubbing.
- Press Stop. Fix any hits in the step sequencer, or press Undo.
- Arm Bass, set the 7 Keys instrument to Bass, and record a bass line the same way. Then do keys, scratches and samples on their own tracks.
- Mix it in the Mixer, add effects, then Save and Download your MP3 in the Project tab.
⚙
Settings & MIDI
The gear button in the header
- Theme Color
Drag around the color wheel or tap a swatch to change the color of the whole machine. Your color is remembered.
- Low CPU
Turns off the turntable and meter animations to help slower computers.
- Full Screen
Fills your screen with the machine. Press Esc to exit.
- Scan for Controllers
Plug in your USB or MIDI controllers, then press Scan. Every controller found is listed. A green dot on the gear button means a controller is active. Controllers you plug in later show up on their own.
- Play From
Have more than one controller? Pick All controllers or one controller from the drop-down list.
- Controller list
Each controller has an ON/OFF switch and a role: Auto, Pads (every note plays a pad) or 7 Keys (plays the keys). The light flashes yellow when it receives a note. Your choices are remembered.
- Which browsers work
USB controllers work in Chrome and Edge on Mac and PC, and in Firefox after it asks you to allow MIDI. Safari does not support USB controllers, so Mac users should open the page in Chrome or Edge.
MIDI controller map
| On your controller | On the STONE-2270 |
|---|
| Notes 36–51 (C1 to D#2), Auto role | Pads 1–16 of the current bank, with velocity |
| Any note, Pads role | Pads 1–16, repeating every 16 notes |
| White keys, middle C and up | The 7 keys (each octave up or down shifts the notes) |
| Pitch wheel | Bend lever |
| Mod wheel (CC1) | Turntable pitch |
| Volume (CC7) | Master volume |
| Sustain pedal (CC64) | Sustain |
⌨
Keyboard Shortcuts
Play the whole machine from your computer keyboard| Key | Action |
|---|
| Space | Play / Stop |
| T | Record on / off |
| Home | Back to the start |
| Esc | Stop all sounds |
| 1–4 Q–R A–F Z–V | Pads 1–16 (hold Shift to hit softer) |
| G H J K L ; ' | 7 performance keys |
| ↑ / ↓ | Bend up / down (springs back when released) |
| B | Turntable start / stop |
| N | Turntable cut (hold) |
| Ctrl+Z · Ctrl+Y | Undo · Redo |
| Delete · Ctrl+D · Ctrl+A · Esc | In the Song Editor: delete, duplicate, select all, close |
?
Troubleshooting
Quick fixesI don't hear anything
- Press Power On first. Browsers block sound until you click.
- Check your computer volume, the Master knob (and that the red Master M isn't lit), and that the browser tab isn't muted.
- Make sure the track isn't muted (M) and no other track is soloed (S).
There's a delay when I play the pads or keys
- Use wired headphones or speakers. Bluetooth headphones add a delay you can hear.
- Use Chrome or Edge, close other busy tabs, and turn on Low CPU in Settings on slower computers.
- Plug your MIDI controller straight into the computer with USB rather than through a hub.
- The Settings panel shows your current audio latency in milliseconds.
My USB controller isn't detected
- On a Mac, Safari can't connect to USB controllers. Open the page in Chrome or Edge.
- Plug the controller in, then press the gear, then Scan for Controllers. Allow MIDI access when the browser asks.
- If you said no to MIDI access before, click the icon at the left of the address bar, allow MIDI devices, and scan again.
- Make sure the controller is switched on, and close other music apps that may be using it.
Tab Audio doesn't record anything
Use Chrome or Edge on a computer. In the share window, choose the tab (not the window or screen) and tick Share tab audio. Start the video playing before you press Stop & Load.
My link won't load
The website hosting that file blocks other sites from using it. Download the file to your computer and use Upload, or play it in a tab and use Tab Audio.
The mic doesn't work
Your browser asks for microphone permission the first time. If you said no, click the lock icon next to the web address, allow the microphone, and try again.
My download is silent or missing a part
Downloads follow your mix. Unmute tracks, clear any solos, and check that the beat plays before you press Download.
My saved beats are gone
Saves live in the browser you made them in. A different browser, a private window or clearing your browsing data won't show them. Use Export .STONE to keep a backup.
Can I use it on my phone?
The STONE-2270 is built for desktop and laptop screens right now. A phone and tablet version, plus a downloadable app, is on the way.